Sunday, March 22, 2015

March 15 Paper Pumpkin

March's Paper Pumpkin brought us a kit that you could make invitations, thank you's or birthday cards. 9 cards with envelopes if made as instructed.

The kit comes with basic yellow embroidery floss and you stitch the 'YOU' with a backstitch.
(if you're familiar with embroidery stitches)

theresastampinfun.blogspot.com


These two cards are created the way you are instructed. Can you see the difference?
The first card is made with the 3 strands of embroidery floss, and the second card is stitched using 6 strands.


*TIP* Thread the needle using the same method when threading a darning needle or use a needle threader or shuttle. (It's a little challenging threading the needle with the floss.)


theresastampinfun.blogspot.com


Here are some alternate cards using this kit. I used a marker or pen to connect my dots instead of doing the stitching.
I felt the stitching was a little time consuming, and I was looking for a different look.


theresastampinfun.blogspot.com


theresastampinfun.blogspot.com

This one I cut the card in half, using just one side, and backed it with pool part card stock. I used the little triangles to make a banner.

If you did this, you could get more cards than nine cards.


Let your imagination run wild and see how many different designs you can come up with.
It takes practice, but the more you do it, the more creative you will feel and be.


Februry Paper Pumpkin

I was on vacation a week ago, so I'm late in posting about the newest paper pumpkins.
February and March are both great kits!

February's kit contained Thank You notes that you could put in little boxes.  
theresastampinfun.blogspot.com


theresastampinfun.blogspot.com


This is what is inside of the left box.
8 panels that you can stamp and add the orange letters.The last panel is blank for you to write on.


theresastampinfun.blogspot.com


Here is what is inside the right box. I cut the 8 panels into 4 small cards. I put them into the box. This would make such a cute little gift or 4 little Thank You cards for you to use.
theresastampinfun.blogspot.com

This card uses a long, skinny piece of white card stock with stamped lines for the background. I put the left over orange felt on top and added 3 dots on the side. It's a little crazy, but I was experimenting.


I have a lot of fun with my paper pumpkin kits. It was extra fun this month because I was able to make the kit with my daughter in Florida.  I hope you all have fun making and trying new ideas with your paper pumpkins. If you don't get the paper pumpkin, it's easy to subscribe. Just click the button on the right.

Tuesday, March 3, 2015

Saturday Workday

Last Saturday, we had a workday at my church. You could bring your projects, spread out your stuff on the big tables, and work on them without interruptions from your husband or children. Here are a few of the projects I worked on.

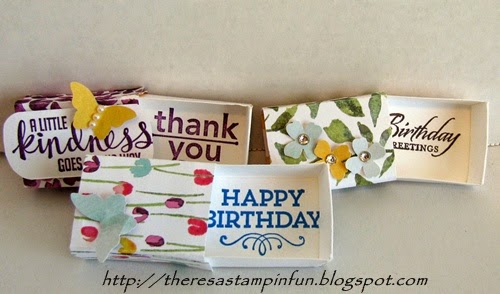
The first project was making these little matchboxes. On the Simplicity blog, she had a tutorial on how to make these. They were so cute, I just had to try it for myself.

One tip I would add would be that when you do the cover, measure it around your box. You may need to loosen it a bit.

http://theresastampinfun.blogspot.com/
Matchboxes Closed

http://theresastampinfun.blogspot.com/
Matchboxes Open


The next project was this set of Thank You note cards. I used the prepackaged note cards from Stampin' Up! They come in a package of 20 pre-cut cards with envelopes. This made the project easy.  To see closeups of the thank you cards, check out the card gallery.


http://theresastampinfun.blogspot.com/


The stamp sets are from Stampin' Up! They are:
  • Wetlands
  • Bloom with Hope
  • Work of Art
  • Kinda Ecletic
  • Bordering Blooms
  • Blessed Easter (retired)


As always, check out the weekly deals and if you would like to purchase any Stampin' Up! products, use the My Stampin' Up! Store link above.