Hi Friends,
Today's card is a one layer card created for the One-Layer Simplicity Challenge.
I've always wanted to participate in their challenges, but lack the time to do so. This week is a vacation week for me, so I have some extra time to create.
This challenge was to use the colors red, yellow and orange. I decided to use my new Paisley & Posies stamp set from Stampin' Up!.
This card started off with a half sheet of heavy weight white cardstock.
I masked the center square with a trimmed down post-it note and started stamping.
The larger circles are in Cherry Cobbler, the orange swirls are Tangelo Twist, and the yellow shapes are Crushed Curry. The leaves are Old Olive.
I took anOld Olive marker and carefully drew around my post-it to create the frame.
The sentiment and flower are from the same stamp set and are stamped in Cherry Cobbler and old olive.
Thanks for coming by to look at my card. What challenges are you taking on today? Fun, creative ones I hope. Have a great week.
Tuesday, October 11, 2016
Thursday, September 22, 2016
Golden Sympathy
Hello Friends,
I had recently reorganized my cards that I had, and put them in a box by type. This was better than having them in piles on my dresser! I saw that I had more than a half a box of birthday cards, and 2 sympathy cards. So, I got busy making cards.
I needed some inspiration, so I looked through my old sets of paper pumpkin.
This card collection uses the August of 2015 paper pumpkin.
Most of these cards are CASED (Copy And Share Everything).
That means I copied someone's card that I saw either on Pinterest or on a paper pumpkin group that I belong to.
Here are a few close ups. I really enjoy taking a paper pumpkin kit and make as many cards as I can with the contents of that kit. In these cards, I added gold ribbon, Black and White cardstock and some pearls.
I still have enough supplies from the kit to be able to make at least 6 to 8 more cards, by just adding the few items I mentioned above.
The white part on this card is a part of the card next to it. They overlapped a bit. I didn't take individual pictures of all the cards.
I hope you enjoyed this little collection of sympathy cards. It's always good to have many different types of cards on hand.
We have our new Holiday catalog available now. There are great new stamp sets in there. Check it out! The link is on the right.
If you ever need help with putting cards together, and want some help, just let me know. I would love to help you.
Wednesday, August 17, 2016
Colorful Crusin'
This month's VC Rock Blog hop is called Colorful Crusin'. This means I was suppose to make a card that is colorful!! Easier said than done!
I struggled for awhile to come up with an idea. When you need inspiration, where do you go? What do you do? Well, my favorite is Pinterest!
If there is a particular stamp set I want to use, I'll google the stamp set. I'll use a search phrase like "Work of Art stampin up images" This will come up with all kinds of pictures to get some inspiration.

This card's inspiration came from this Pinterest post that I had pinned a long time ago. This card is similar, yet different.
So, how did I do this? I'm glad you asked.
The base of the card is Crumb Cake cardstock.
The patterned paper is from a 6 x 6 stamp stack named Playful Palette.
The colorful background on the white uses the smaller splotch from the Work of Art stamp set. The cone, ice cream and sentiment are from the Sprinkles of Life stamp set.
Ink colors and other pieces of cardstock are:
Crumb Cake, Peekaboo Peach, Pool Party and Flirty Flamingo.
I cut out the ice cream with the tree builder punch and I decorated the top scoop with some tiny pearls.
I didn't put anything in the inside, but it would make a great birthday card, or friendship card. The "Sprinkles" stamp set includes sentiments that would work for either one.
Thanks for coming by and checking out my colorful card. Now cruise on over to the VC Rocks blog hop and check out all the other colorful cards made by the other talented stampers.
I struggled for awhile to come up with an idea. When you need inspiration, where do you go? What do you do? Well, my favorite is Pinterest!
If there is a particular stamp set I want to use, I'll google the stamp set. I'll use a search phrase like "Work of Art stampin up images" This will come up with all kinds of pictures to get some inspiration.

This card's inspiration came from this Pinterest post that I had pinned a long time ago. This card is similar, yet different.
So, how did I do this? I'm glad you asked.
The base of the card is Crumb Cake cardstock.
The patterned paper is from a 6 x 6 stamp stack named Playful Palette.
The colorful background on the white uses the smaller splotch from the Work of Art stamp set. The cone, ice cream and sentiment are from the Sprinkles of Life stamp set.
Ink colors and other pieces of cardstock are:
Crumb Cake, Peekaboo Peach, Pool Party and Flirty Flamingo.
I cut out the ice cream with the tree builder punch and I decorated the top scoop with some tiny pearls.
I didn't put anything in the inside, but it would make a great birthday card, or friendship card. The "Sprinkles" stamp set includes sentiments that would work for either one.
Thanks for coming by and checking out my colorful card. Now cruise on over to the VC Rocks blog hop and check out all the other colorful cards made by the other talented stampers.
Sunday, August 7, 2016
Swap, Sympathy, and Get Well Cards
Hi Friends,
I wanted to share with you some cards I made lately.
Like in the title, 2 are for a swap, 3 are sympathy cards, and one get well card.
The first two cards were for swaps. The swaps have a theme and then you make 6 to 10 cards. You then send the cards to the hostess, and she sends you back one card from each of the other participants.
For the left card, you were to make a card using the Big Shot. I used it by cutting out the butterflies.
The card on the right, you were to use the new colors. (there are 5 new colors each year)
The next cards are sympathy cards. Unfortunately, we all need them at some time. I have a new stamp set called Rose Wonder. It has such a beautiful rose and the sentiments are so nice. It includes birthday, thanks, and sympathy sentiments.
The last one is a get well card for my sweet grandson who had his tonsils out. I'm so glad this card put a little smile on his face.
This stamp set is one of my oldie, but goodie stamp sets. I've always liked the bandage with the sad face.
I hope you enjoyed looking at my cards. It's one of my favorite hobbies.
TFL (Thanks for looking!)
Friday, July 29, 2016
Cruisin’ With Fun Folds
Greeting Stampers,
Today for the VC Rocks blog hop we're cruising with Fun Folds.
My fun fold card today is a simple fun fold called a gate card.
Here is my Birthday card. It looks simple, but it took a little work.
First the recipe:
Stamp set: Birthday Blossoms
Inks: Sweet Sugarplum and Emerald Envy
Cardstock: Sweet Sugarplum, Emerald Envy, and Very Vanilla
Designer Series Paper: Playful Palette
Bling: Jewel Basic Rhinestones (in the center of the flowers)
As you open the card, you see the gate part of it is where the right side of the center fits into the left square frame and tucks under the flowers.

And you can see inside the card is very vanilla with the Happy Birthday sentiment.
Now hop on over to VC Rocks and check out all the other cute fun fold cards. Let us know what you think of them in the comments.
Today for the VC Rocks blog hop we're cruising with Fun Folds.
My fun fold card today is a simple fun fold called a gate card.
Here is my Birthday card. It looks simple, but it took a little work.
First the recipe:
Stamp set: Birthday Blossoms
Inks: Sweet Sugarplum and Emerald Envy
Cardstock: Sweet Sugarplum, Emerald Envy, and Very Vanilla
Designer Series Paper: Playful Palette
Bling: Jewel Basic Rhinestones (in the center of the flowers)
As you open the card, you see the gate part of it is where the right side of the center fits into the left square frame and tucks under the flowers.

And you can see inside the card is very vanilla with the Happy Birthday sentiment.
Now hop on over to VC Rocks and check out all the other cute fun fold cards. Let us know what you think of them in the comments.
Sunday, June 26, 2016
Blog Hop: Crusing with Florals
Hi Friends,
This is the season of Flowers! I love Spring & Summer because of all the beautiful flowers that are around and smell so wonderful.
Our blog hop for this month is called "Crusing with Florals". I used the new colors and some paper from the new Stampin' Up! catelog. I also used the new to me stamp set called "Grateful Bunch".
This card is made with a white cardstock base.
The paper on the left side is from the Designer Series Paper called "Blooms & Bliss".
The inks I used are Sweet Sugarplum, Old Olive and Tuxedo Black Memento ink.
The flowers are mounted with a dimensional and a jewel basic rhinestone center.
I'm not sure if you can tell, but I put a little "Wink of Stella" on the flowers.
Thanks for stopping by and looking at my cards. Hop on over to the VC Rocks Blog to see the other cards created celebrating Flowers!

Friday, May 27, 2016
2016 VC Rocks Blog Hop
Hi Stampin' friends,
It's time again for the VC Rocks Blog Hop. This month's theme is "Cruisin' for Special Occasions".
Now what could be more special than celebrating my little granddaughter's First Birthday!
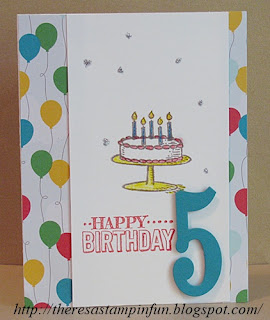
And just as special, is big sister's birthday #5, both happening in June!

Both cards use the 'Cherry on Top' Designer Paper Series 6 x 6 paper stack, and the 'Number of Years' stamp set with matching framelits. (I am in love with this set!)
This card uses 2 circles that I turned into balloons. The balloons are Crushed Curry embossed with the Perfect Polka Dots embossing folder. The Pool Party balloon is lightly sponged with the same color to give it a little dimension.
I added Bermuda Bay baker's twine for the strings on the balloons, and stamped the words and #1 in Watermelon Wonder.
This card uses a retired Sale-a-bration stamp set named "Big Day". I love the cake in this set. I used Tip Top Taupe to stamp the cake and Watermelon Wonder, stamped off, to stamp the sentiment.
The card seemed like it needed just a little something more, so I randomly added little drops of Silver Dazzling Diamonds in the white section.
Thanks for stopping by to check out the Special Occasion cards.
Now, hop on over to VC Rocks and see the other special occasion cards submitted by other in the group.
It's time again for the VC Rocks Blog Hop. This month's theme is "Cruisin' for Special Occasions".
Now what could be more special than celebrating my little granddaughter's First Birthday!
And just as special, is big sister's birthday #5, both happening in June!

Both cards use the 'Cherry on Top' Designer Paper Series 6 x 6 paper stack, and the 'Number of Years' stamp set with matching framelits. (I am in love with this set!)
This card uses 2 circles that I turned into balloons. The balloons are Crushed Curry embossed with the Perfect Polka Dots embossing folder. The Pool Party balloon is lightly sponged with the same color to give it a little dimension.
I added Bermuda Bay baker's twine for the strings on the balloons, and stamped the words and #1 in Watermelon Wonder.
This card uses a retired Sale-a-bration stamp set named "Big Day". I love the cake in this set. I used Tip Top Taupe to stamp the cake and Watermelon Wonder, stamped off, to stamp the sentiment.
The card seemed like it needed just a little something more, so I randomly added little drops of Silver Dazzling Diamonds in the white section.
Thanks for stopping by to check out the Special Occasion cards.
Now, hop on over to VC Rocks and see the other special occasion cards submitted by other in the group.
Thursday, May 12, 2016
Celebrating Spring and April Paper Pumpkin 2016
HI Stamping Friends,
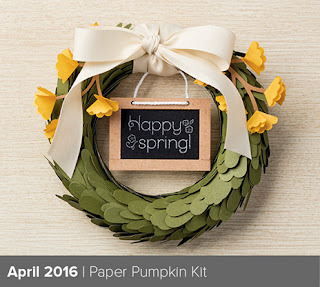
Today's post features the April Paper Pumpkin. This month came with a free stamp set to celebrate Paper Pumpkin's 3rd birthday and the mailing of their 1 millionth kit!
Here is the little wreath that you can make according to package directions.
I made one and hung it up at my work. Things just had to start looking a little more springy!
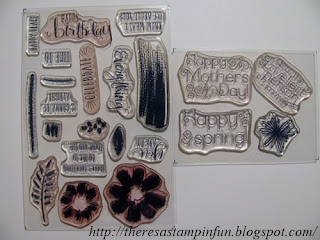
This kit, as I mentioned, came with an extra stamp set.
The stamp set on the left is the bonus stamp set. It's very cute, and of course, I can't just make cards according to package directions.
On the Paper Pumpkin Facebook page, many group members created a one sheet wonder with the bonus stamp set. I took this as a challenge.
Here is what I came up with:
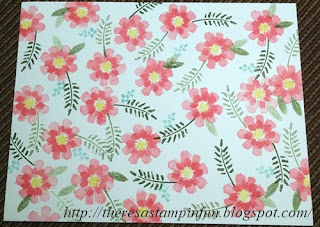
How do you make a OSW (one sheet wonder)?
First you start with the flower stamp, stamping randomly. Then add the green leafy stamp. The stamp set has a little square lined stamp that I used to do the yellow center of the flowers, and then I added a little blue for an accent.
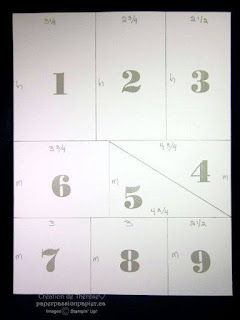
Here is the pattern to cut up the sheet that you created. You don't have to cut it in this pattern, but it will give you some place to start.
You can just cut it into rectangles like the top of the pattern.
Here are the cards I made. I used mostly extra pieces from the kit.
I didn't add much besides white card stock, and some Mossy Meadow, Daffodil, and Pool Party card stock as back grounds to mount the cut pieces on.
I also added a little ribbon on a couple of the cards.
The thing about a one sheet wonder is that they can make 9 to 12 cards, depending on how you cut them. If you make just straight cuts, you can make the cards all the same if you want. Doing it the way I did gives me a variety of cards.
Don't be afraid to experiment. You can use any type of stamp set that you like. (It doesn't have to be flowers!)
Happy Stamping!
Thursday, April 14, 2016
March 16 Paper Pumpkin and a Male Birthday
Hi Stampers,
I finally got back to stamping and I'm featuring the March Paper Pumpkin with a few alternates.
First, I want to show you a male birthday card I created. This card followed a sketch from one of my favorite sites, "Stampin' Gals Gone Wild". She has some great sketches.
Here is my card. The car is from a set named "Guy Greetings".
The designer series paper (DSP) is a 6 x 6 stack named "Go Wild".
The little dots or gems next to the car are small rhinestones colored with a black sharpie.
This sketch is such a nice, simple, and versatile design.
Now for the March Paper Pumpkin I told you about last month. This month was the 3rd Birthday for Paper Pumpkin, and they shipped their 1 MILLIONTH Kit!!
Here is the card made according to package directions.
This kit made 4 cards, 4 envelopes, 4 gift card holders, and 4 little cards for the holders.
They are just right for birthdays, graduations, or just a thinking of you card.
Here is my first alternate card with this kit. You might have noticed that I used the same sketch above.
The patterned paper is from one of the envelopes.
When you get your kits, don't be afraid of cutting up the paper or envelopes. They usually are decorative and can be incorporated into cards.
Here is one more alternative. Can you see the difference between them?
The left one does not have the 3 little green beads on the center square. I couldn't decide which one I liked better or looked better. What do you think? I'd love to hear your comments.
Next month's paper pumpkin we get a free stamp set in the kit as a birthday present to us. I'm excited to see it.
It will be here soon.
Contact me anytime. To subscribe to Paper Pumpkin, click the link on the right.
Keep Stamping!!
I finally got back to stamping and I'm featuring the March Paper Pumpkin with a few alternates.
First, I want to show you a male birthday card I created. This card followed a sketch from one of my favorite sites, "Stampin' Gals Gone Wild". She has some great sketches.
|
|
Here is my card. The car is from a set named "Guy Greetings".
The designer series paper (DSP) is a 6 x 6 stack named "Go Wild".
The little dots or gems next to the car are small rhinestones colored with a black sharpie.
This sketch is such a nice, simple, and versatile design.
Now for the March Paper Pumpkin I told you about last month. This month was the 3rd Birthday for Paper Pumpkin, and they shipped their 1 MILLIONTH Kit!!
Here is the card made according to package directions.
This kit made 4 cards, 4 envelopes, 4 gift card holders, and 4 little cards for the holders.
They are just right for birthdays, graduations, or just a thinking of you card.
Here is my first alternate card with this kit. You might have noticed that I used the same sketch above.
The patterned paper is from one of the envelopes.
When you get your kits, don't be afraid of cutting up the paper or envelopes. They usually are decorative and can be incorporated into cards.
Here is one more alternative. Can you see the difference between them?
The left one does not have the 3 little green beads on the center square. I couldn't decide which one I liked better or looked better. What do you think? I'd love to hear your comments.
Next month's paper pumpkin we get a free stamp set in the kit as a birthday present to us. I'm excited to see it.
It will be here soon.
Contact me anytime. To subscribe to Paper Pumpkin, click the link on the right.
Keep Stamping!!
Sunday, March 13, 2016
February and March 16 Paper Pumpkin
Hi Stampers,
March is Paper Pumpkin's 3rd Birthday!
And the sale of Paper Pumpkins is still on!
Buy a 3 month pre-paid subscription to paper pumpkin and get 1 Sale-a-bration item free!
Now for the February paper pumpkin. We had a craft work day at my church, and I had time to play with the February kit. I just love it. It is so versatile!
The first picture is of the cards made according to package directions. Very cute cards in my opinion.
Here are a couple of the alternatives I came up with.
The left card uses the negative space from the middle swirly gold flower above.
I added Pool Party and Calypso Coral flowers.
The right one, is using the envelope, cut apart and added to a white card base. I added just a few light flowers.
The right one is using the negative space from the left card above with some added flowers and sequins.
The left one, I added some Blackberry Bliss ribbon. The left side of the card is a portion of the card from the top right.
There are so many ways to put these cards together, you just have to let your imagination run wild.
If you make this kit as directed, you will have 9 cards with envelopes. There is always more than enough supplies in one kit to make more cards than that.
I hope you are enjoying getting the surprise every month. I sure do! I can't wait to see what they send us for the March Birthday kit.
If you would like to purchase the 3 month supply of Paper Pumpkins, go to My Stampin' Up! Store.
Thanks for looking, and contact me if you have any questions.
Wednesday, February 24, 2016
Cards for Life Events
Hello Stamping Friends,
It's been a while since I posted anything. So, I thought I'd show you some projects that I've worked on.
First I needed a birthday card for my sweet granddaughter who turned 3. This card is a case of one made by Patsy. I get great inspiration from her.
Stampin' Up! has a new stamp set with matching framelits that have all the numbers, and many different words. I know this will become one of my favorites. See it here.
I needed a sympathy card for a friend. This card uses the flowers from the set named "Wild about Flowers". It's in the big catalog, here.

Death and Life, the inevitable parts of our world that we all participate in. In January, we had both. I made this for a friend that had a new little girl. The stamp set is new to me. It's called, "Barnyard Babies". This is also in the big catalog, here.
This Guy Birthday card isn't for anyone in particular, but I made it to participate in a sketch challenge.
The stamp set is called Guy Greetings, and works perfect for all the guys in your life. It has birthday, congratulations, and Father's Day sentiments. I used the brick embossing folder on the navy paper behind my 'guy'.
Inspiration comes from many places. My card inspirations came from necessity, casing a friend's card, and using a sketch.
Coming up, the January Paper Pumpkin. I am behind on making my paper pumpkins. I might need to include the February one. That should be here soon.
Stay inspired, and keep stamping!
It's been a while since I posted anything. So, I thought I'd show you some projects that I've worked on.
First I needed a birthday card for my sweet granddaughter who turned 3. This card is a case of one made by Patsy. I get great inspiration from her.
Stampin' Up! has a new stamp set with matching framelits that have all the numbers, and many different words. I know this will become one of my favorites. See it here.
I needed a sympathy card for a friend. This card uses the flowers from the set named "Wild about Flowers". It's in the big catalog, here.

Death and Life, the inevitable parts of our world that we all participate in. In January, we had both. I made this for a friend that had a new little girl. The stamp set is new to me. It's called, "Barnyard Babies". This is also in the big catalog, here.
This Guy Birthday card isn't for anyone in particular, but I made it to participate in a sketch challenge.
The stamp set is called Guy Greetings, and works perfect for all the guys in your life. It has birthday, congratulations, and Father's Day sentiments. I used the brick embossing folder on the navy paper behind my 'guy'.
Inspiration comes from many places. My card inspirations came from necessity, casing a friend's card, and using a sketch.
Coming up, the January Paper Pumpkin. I am behind on making my paper pumpkins. I might need to include the February one. That should be here soon.
Stay inspired, and keep stamping!
Subscribe to:
Comments (Atom)


